
| Back to index Next Page Previous Page |
© Copyright Merrick & Day
Follow the manufacturer's installation instructions and advice when fitting tracks and poles. Fitting hardware can be heavy work, so it makes sense to have someone with you to help; in most cases, you will definitely need another pair of strong hands. Ideally, curtain fixtures should be fixed into place before the curtains are made so that accurate measurements can be taken.
| TOOLBOX Electric drill and drill bits Pipe and cable detector Retractable steel tape measure Spirit level Hammer and tacks Staple gun and staples Pliers (a really strong pair) Galvanised steel No.8 wood screws, 20-50mm (3/4-2in) Wall plugs for No.8 wood screws Screw drivers |
Step ladder Extension lead Wood doweling or plastic spacers Brackets for pelmet board Tie-back hooks Ess hooks Screw eyes Small tenon saw Plaster filler Silicone spray Bradawl |
Professional Tip
TRACKS
You can hang lightweight curtains from plastic tracks but always use metal corded tracks, for heavier interlined curtains.
Tracks are either top fixed to the underside of the pelmet board or face fixed to the wall. When tracks are corded, the cords can be fitted into a tensioner which is screwed into the wall or onto the skirting board. Alternatively, the cords can be cut and have brass acorn weights tied onto each end. Note this can only be done when the track length is less than the track to floor measurement.
Tracks should be sprayed with a silicone spray to ensure that they run smoothly.
Most track brackets convert to either top or face fixing but double check when you purchase them.
 |
There are so many kinds of track that It is very important to make sure you understand the instructions. Call the manufacturers if you are in any doubt or difficulty.
FITTING PELMET BOARDS
These are made from 20mm (3/4 in) PSE timber and are either painted or covered with matching fabric. The length of the board should be approximately 5cm (2in) longer than the track, to allow space for the curtain to be returned to the wall. The width of the board is usually in the range of 15-23cm (6-9in). The width is dictated by the number of layers used in the window treatment and also any protrusions, such as radiators, that could affect the hang of the curtain.
 |
When pelmets, valances, swags and tails are fixed to the front edge of a pelmet board the curtain track should be set back 6-8cm (2-3in) to allow the curtains free movement. A similar distance is required between the track and the wall or window, hence the depth of a pelmet board is usually 12-18cm (5-7in).
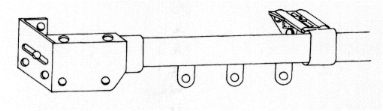
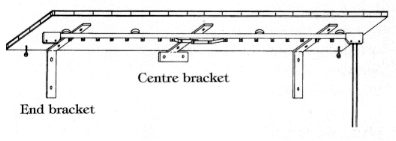
End brackets should be approximately 2.5cm (1in) shorter than the width of the board to give maximum support. A centre bracket is required for pelmet boards over 170cm (67in) long. These have a short back plate so that they are unobtrusive.
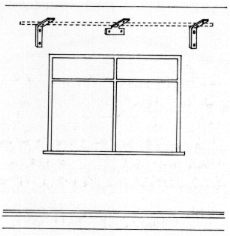
At one side of the window, measure up from the top of the window to the bottom of where you want the pelmet board to be. Mark with a pencil, then repeat on the other side. Using a flat piece of wood or a metre stick, draw a line between the two points.
If this line looks level to the eye, mark the position of the brackets. Hold one bracket against the wall and mark the wall through the screw holes with a pencil. Repeat for the second bracket and any other brackets.
Drill holes about 44mm. (l 3/4in) into the wall. Insert plugs into the wall and fix the brackets securely to the wall with No.8 (1 3/4 in) screws.
 |
Lay the pelmet board across the brackets and centre it over the window. On the underside of the pelmet board, mark through the screw holes with a bradawl. Using No.8 25mm (l1in) screws, secure the pelmet board into position.
Professional Tip
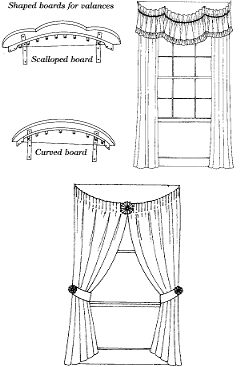
| SHAPED PELMET BOARDS
Curved and shaped pelmet boards are a simple and inexpensive way of elevating valances and fixed-headed curtain treatments. They work well on classic, portrait shaped windows up to 2m (2yd) wide. Curved boards should have a minimum central depth of 23-30cm (9-12in). They can be cut out of timber or plywood. There should be sufficient depth left at the sides of the board for small brackets. Scalloped boards are made up in the same way as curved boards but with additional scallop shaping. They can be up to 35cm (14in) deep at the centre. If you want to fix a valance to the board, stick or staple Velcro to the front edge. Track specialists can bend tracks to the shape of the board from a template. Tracks should be fitted about 7.5cm (5in) in from the front edge of the board. If the curtains are permanently secured in the centre, fix 20mm (3/4in) screw eyes onto the lower edge of the board 1cm (1/2in) in from the front edge. You will always need some method of holding the curtains back when the top is fixed. A tiara board has a 'tiara' shaped piece of wood screwed to the pelmet board, flush with the front. |
 |
| BAY WINDOW FITTINGS
Plastic tracks curve around bays quite easily, but use metal for heavy interlined curtains. These will need to be custom curved to fit around your bay. Pelmet boards are fitted as for a straight run, but are mitred at the angles with brackets screwed each side of the mitres. Poles can be fitted in the same way. Hang a curtain at each angle, either side of the supporting bracket. |
 |
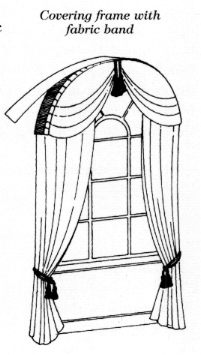
| ARCHED FITTINGS Either fit a pliable plastic track, or bend a metal track to the correct shape. The tracks can be bent and fitted to the architrave of the arch, or onto a plywood frame. If swags are going to be fitted in front of the curtains, make a 7.5cm (5in) deep plywood frame for them. Cover the plywood with a band of fabric. |
 |
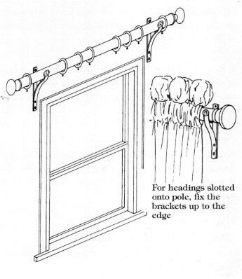
| FITTING POLES Work out the distance between the brackets; this must be 5-15cm (2-6in) less than the pole length (calculated without the finials). Measure the height up from the floor, mark the position of the bracket screw holes with a pencil. Drill and plug holes and screw the bracket into position. Rest the pole in the bracket and move to the other side of the window. Check that the pole is level to the eye; remove the pole and fix the second bracket. Poles over 150cm (59in) will need a centre bracket. Put the correct number of rings on the pole. Gathered headings usually have a hook every 15cm (6in). Hand pleated curtains generally have one hook per pleat. Screw the finials into place at each end of the pole. Centre the pole on the brackets. Make sure there is one ring between the bracket and the finial on each side. There should be equal numbers of rings on either side of the centre bracket. |
 |
| MAKING FABRIC-COVERED LATHS
The track is fitted to the underside of a narrow 10cm (4in) pelmet board and concealed by a fabric or wall paper covered fascia. The fascia can be made from either hardboard or pelmet buckram to a depth that allows the hooks and overlap arms free movement. To make a lath, tack a hardboard fascia approximately 4.5cm (1 3/4in) deep to the front of a narrow pelmet board. Cover it using glue or a staple gun. Fix the track directly behind the fascia, with the runners and arms hanging below. Position screw eyes and hooks at. the ends of the lath for the curtain return. You can screw the pelmet board into the ceiling if there is no space on the wall for fixing brackets. |
 |
Professional Tip
| Back to index Next Page Previous Page |