
| Back to index Next Page Previous Page |
© Copyright Merrick & Day
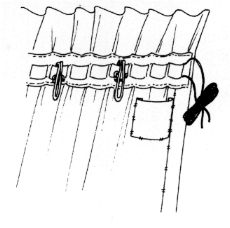
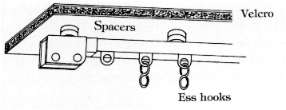
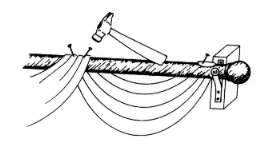
| HANGING CURTAINS For tape headed curtains, work from the outside edges and pull up the draw cords. Allow enough width for the curtains to be returned at the outside edges. The surplus cord can be wound into a skein and tucked into a small pocket sewn at the top of the curtain. Insert hooks into the tape pockets every 15cm (6in). For hand pleated curtains, hooks should be pinned in or sewn at each pleat and on the returns and overlaps. For a multilayered treatment, start by hanging the layer nearest to the window glass and work outwards. Set the ladder so that you have the least stretching to do. Put the curtains over one shoulder to take the weight. Start hanging the curtains from the centre of the track. Never start by hooking them onto the overlap arm, as the weight will bend it, or worse still, snap it off completely. The outside edges of the curtains should be hooked onto a screw eye so that the curtains are returned to the wall. If the curtains are short you could lengthen them using spacers and/or Ess hooks, see opposite. If you are using pin hooks, they can be adjusted up or down to raise or lower the curtains. |
|
||||

DRESSING CURTAINS
When curtains are first hung they should be dressed to encourage them to fall into rounded, even folds. Interlined curtains respond especially well to this process.
To dress the curtains, draw them into their stack back position and, starting from the outside edge, work from the top downwards and run your hands firmly down the length of each pleat or fold.
For goblet or French pleats hung from. a pole, or a track where the top of the curtain hangs below it, push the spaces to the back. Where curtains are hung from a lath with a fascia, or where the heading hangs in front of the track, pull the spaces between the hooks forward.
TO STEAM CURTAINS
Ideally, creases should be allowed to hang out naturally. Steamers can be used, but the combination of heat and moisture can cause shrinkage.Thev are however, good for raising the pile on velvet. Special fabric anti-crease sprays are also available, check the manufacturers' instructions and use with care.
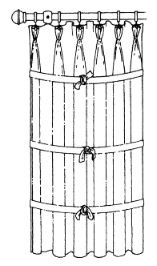
| TO BANDAGE CURTAINS Tie three strips of waste lining or fabric, and bandage around each curtain. They should hold the folds in position but they should not be so tight that they leave indentation marks. Leave for 2 or 3 days Remove the ties and draw the curtains. They should then hang in the set folds. |
|
ADJUSTING THE CURTAIN LENGTH
If the curtain track is covered by a valance or pelmet, it is possible to adjust the length of the curtains to compensate for uneven floors, or for curtains which have shrunk during cleaning.
You can use metal Ess hooks, opened up with pliers, to hang between the gliders and the curtain hooks.
To lower a track underneath a pelmet board, place one or two small spacers between the track and the pelmet board. Replace track with longer screws to compensate.
If needed, use both methods together
 |
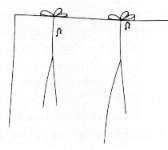 |
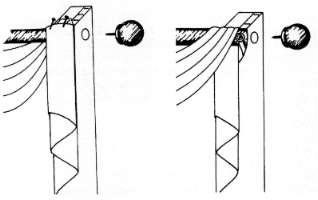
| Pin hooks which can be moved up and down on buckram headings. |
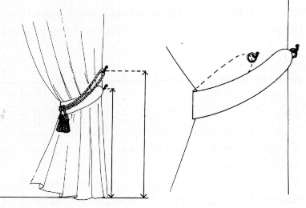
FITTING TIE-BACK HOOKS
Tie-backs need to be positioned with care in order to maintain the best proportions. For full length curtains, the hooks are usually fixed around 95cm (38in) up from the floor.
For tassel tie-backs however, hooks need to be fitted slightly higher, approximately lOOcm (39in) up from the floor.
Do not fit the tie-back hooks until after the curtains have been hung, so that you can check that the outside edges of the curtains hang straight.
 |
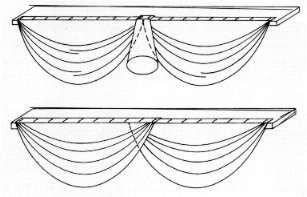
HANGING VALANCES AND PELMETS
Valances are either hooked onto a valance rail or, when hung from. a pelmet board, fitted to the front with Velcro fastening tape.
Using Velcro ensures that the valance is taut against the front edge, and gives a neat finish. When fitting valances always start from. the centre of the valance and the board, and work outwards to each side.
Dress the valance into its folds and also smooth any fringing or frill. Fine fringing can be straightened by using a soft bristle brush to comb it out.
Flat pelmets are also hung using Velcro. Again, start at the centre of the board and work outwards. For both valances and pelmets, see that the returns are smoothed neatly onto the Velcro as you turn the corner.
FITTING BLINDS
For specific information on the fitting of each type of blind, see ppl98-205 The Encyclopaedia of Curtains.
It is especially important to make sure that all recessed blinds are level. Not just because they will not pull up and down easily, but because inside the hard lines of the window recess, any tilt to one side will be much more obvious.
Flat Roman blinds hanging outside the recess should be fixed as close to the wall as possible otherwise the gap at the sides will let in a great deal of light and make the whole fitting look clumsy. There are strong metal tracks with pulley systems available for large or heavy Roman blinds.
All gathered or Roman blinds should be dressed after they are hung.
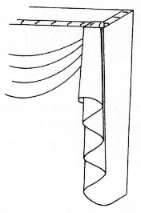
| HANGING SWAGS AND
TAILS Hung from a pelmet board, swags and tails are finished at the top with a simple fabric binding. This should be sewn securely as it will hold the entire weight of the swag. Either tack or staple the binding onto the top of the board, or face fix with Velcro onto the front edge. It is easier to fit swags onto the board before you put it up. Fix the brackets to the wall, as on p225 The Encyclopaedia of Curtains. Lay the board on the edge of a table so that the swags can hang freely. Tack, staple, or Velcro each swag in order, following the design. Start at the centre as usual. Pull the tops taut as you work to prevent any puckering. Now place the whole pelmet board onto its brackets and screw firmly in place. This is usually a two-person job, especially for a wide window. Once the pelmet board is in place, you can fir the tails, making sure they hang straight. Tack, staple or Velcro them in place, with the binding folded onto the top edge of the board. Take care to fix the corners neatly. |
|
||||
| Professional Tip |
|||||
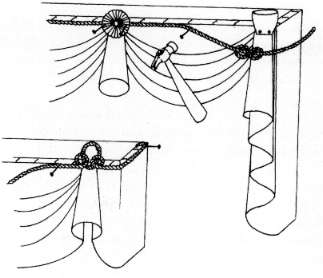
DECORATIVE ROPE AND TRIMS
Once the basic valance or pelmet is in position you can add any rope and/or small trims. Fix them to the front edge of the board with 22mm (3/4 in) brass tacks.
If your design includes coronets, tack them into place before you add the rope trim in front.
Make knots or rope clovers, see pl49. Work from the centre out to each side. Tack either side of each knot or clover and continue tacking every 20cm (8in).
At the ends, cut the rope and wrap sticky tape around the end to stop it unravelling. Tuck the end under at the very back of the return and tack firmly in place.
 |
DRAPING SWAGS OVER POLES
The curtains are hung from a track on the wall, set behind and below the pole. The pole should be slightly longer than the track and should be extended by screwing onto wooden blocks, see Professional Tip p227 in The Encyclopaedia of Curtains.
The top of the swag is self neatened, see pl85 in The Encyclopaedia of Curtains. Put up the pole, and then drape the swags over it, one at a time, adjusting the drop to suit your design. Then tack the swag in place. If you have a metal pole, glue Velcro to the pole in the appropriate places, and sew the other side of the Velcro to the swag.
 |
Now fit the tails. If the design shows they fall over in front of the pole, tack the binding to the top. Screw in the finial and make sure the tail side return folds flat.
If the tail falls behind the pole, you will have to cut a tiny slit at the side of the return so that the finial can be screwed to the pole.
 |
| Back to index Next Page Previous Page |